基于Bilibili黑马程序员Vue2+vue3教程的学习笔记(3)
动态组件
动态切换组件的显示与隐藏
component标签
vue提供了一个内置的<component>组件,专门用来实现动态组件的渲染。
<component>基本使用
1
2
3
4
5
6
7
8
9
10
11
12
13
14
15
16
17
18
19
20
21
22
23
| <template>
// 使用component的is属性,插入其他组件,component就相当于一个占位符
<component is="Left"></component>
// 绑定动态的属性,方便后期修改
<omponent :is="comName"></omponent>
</template>
<script>
import Left from '@/components/Left.vue'
import Right from '@/components/Right.vue'
export default {
data() {
return {
comName: 'Right'
}
},
components: {
Left,
Right
}
}
</script>
|
动态切换组件的显示与隐藏
1
2
3
4
5
6
7
8
9
10
11
12
13
14
15
16
17
18
19
20
21
22
23
| <template>
// 绑定动态的属性,方便后期修改
<omponent :is="comName"></omponent>
<button @click="comName = 'Left'">显示Left</button>
<button @click="comName = 'Right'">显示Right</button>
</template>
<script>
import Left from '@/components/Left.vue'
import Right from '@/components/Right.vue'
export default {
data() {
return {
comName: 'Right'
}
},
components: {
Left,
Right
}
}
</script>
|
keep-alive的使用
动态创建和隐藏组件会被销毁或者重新创建,组件的状态不会被保存
使用keep-alive标签可以解决以上问题
1
2
3
4
5
6
7
8
9
10
11
12
13
14
15
16
17
18
19
20
21
22
23
24
25
26
| <template>
// keep-alive可以把内部的组件进行缓存,而不是销毁组件
<keep-alive>
// 绑定动态的属性,方便后期修改
<omponent :is="comName"></omponent>
</keep-alive>
<button @click="comName = 'Left'">显示Left</button>
<button @click="comName = 'Right'">显示Right</button>
</template>
<script>
import Left from '@/components/Left.vue'
import Right from '@/components/Right.vue'
export default {
data() {
return {
comName: 'Right'
}
},
components: {
Left,
Right
}
}
</script>
|
keep-alive对应的生命周期函数
- 当组件被缓存,会触发deactivated
- 当组件被激活,会触发activated
1
2
3
4
5
6
7
8
9
10
11
12
13
| export default {
ceated() {
console.log('组件被创建了')
},
activated() {
console.log('组件被激活了')
},
deactivated() {
console.log('组件被缓存了')
}
}
|
keep-alive的属性
include属性
include属性用来指定: 只有名称匹配的组件会被缓存。
多个组件名之间使用英文的逗号,分隔
1
2
3
4
5
6
| <template>
// 表示Left,Right都会被缓存
<keep-alive include="Left,Right">
<omponent :is="comName"></omponent>
</keep-alive>
</template>
|
exclude属性
与include相反,这两个属性不能同时使用
1
2
3
4
5
6
| <template>
// 表示Left组件不会被缓存
<keep-alive exclude="Left">
<omponent :is="comName"></omponent>
</keep-alive>
</template>
|
组件声明的name属性
在组件默认导出时,使用name节点为组件取名
如果使用了name那么include和exclude就需要传name中的名字了
1
2
3
4
| export default {
name: 'MyRight'
}
|
组件注册名称主要是用来以标签形式使用
对比:
- 组件的注册名称的主要应用场景时:以标签形式,把注册好的组件,渲染和使用到页面结构之中
- 组件声明的
name名称主要的应用场景:结合<keep-alive>标签实现组件缓存功能,以及在调试工具中看到组件的name名称
插槽
插槽(Slot)是vue为组件的封装者提供的能力。允许开发者在封装组件时,把不确定的、希望由用户指定的部分定义为插槽。
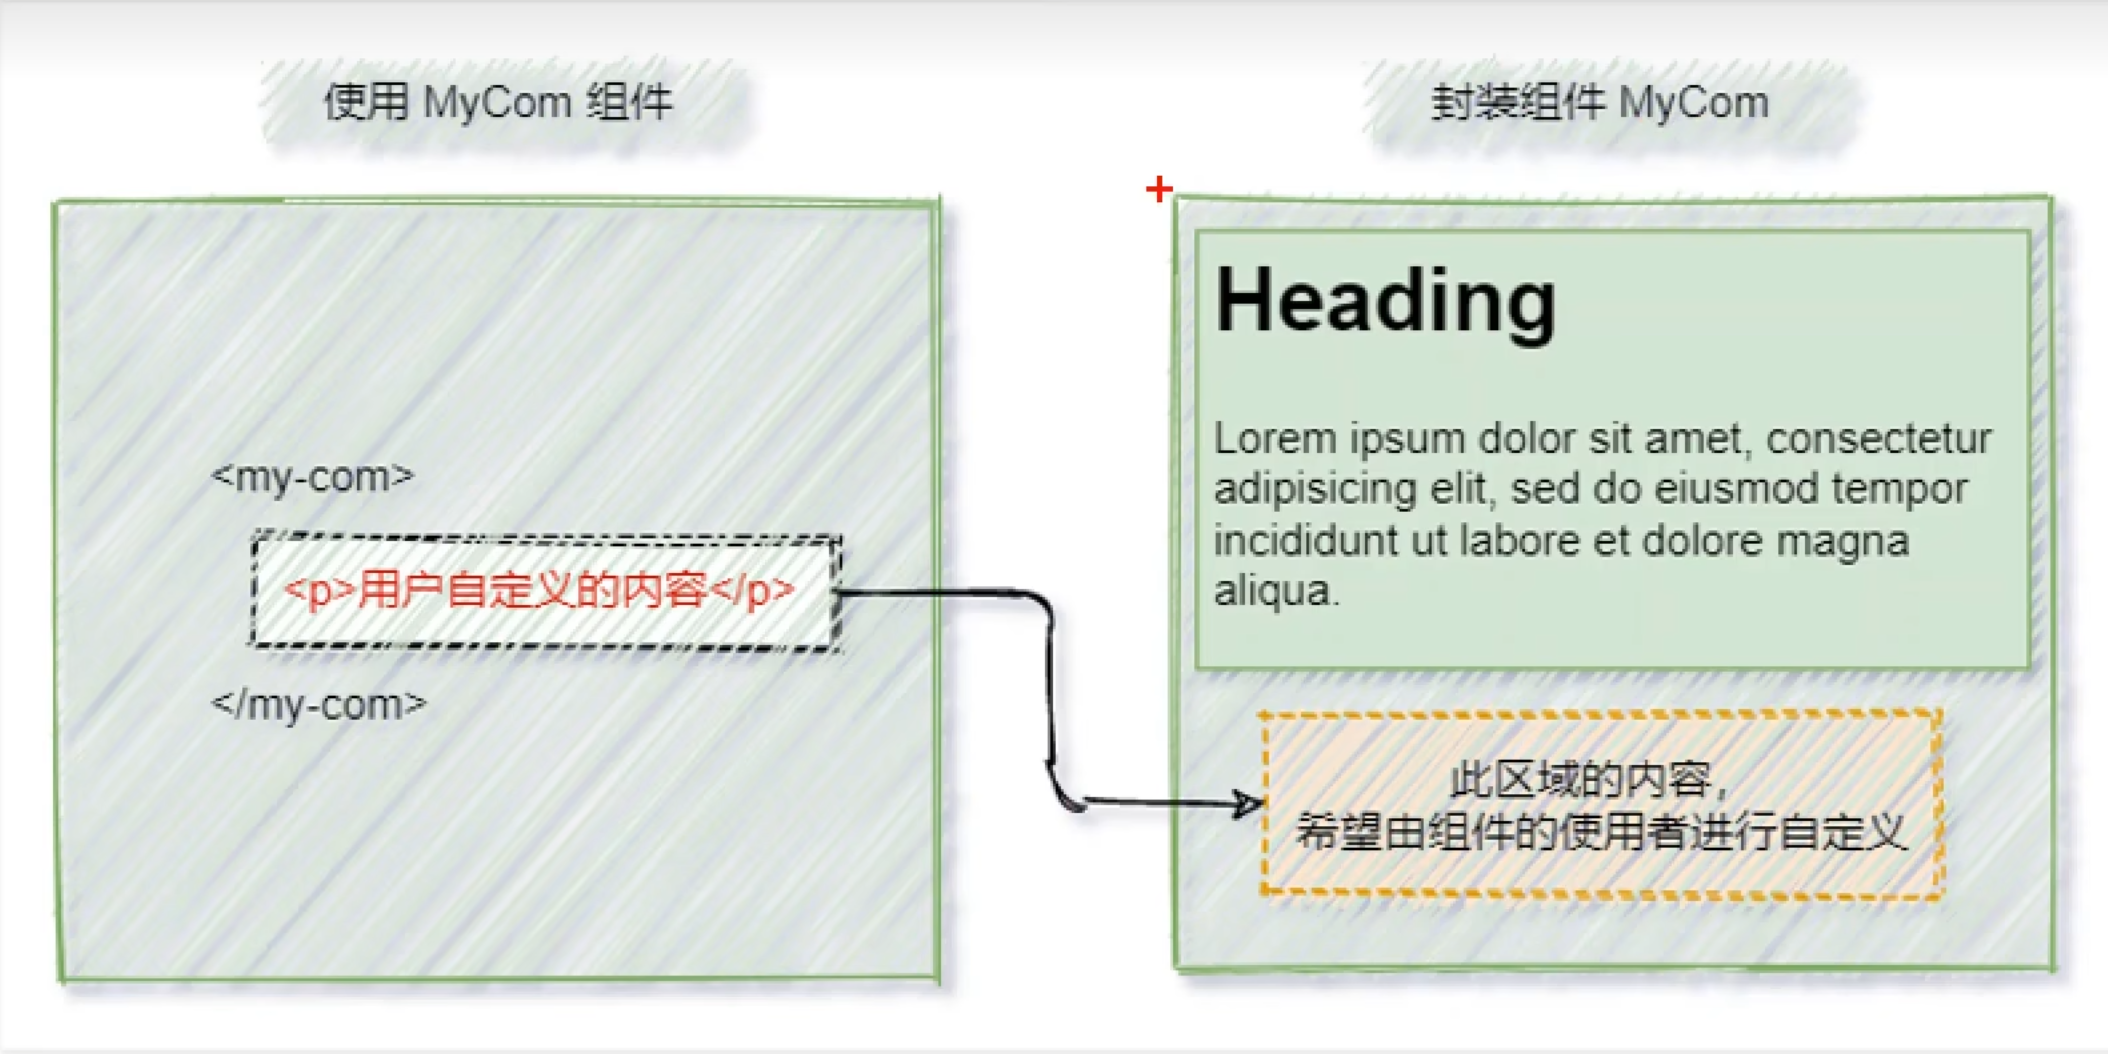
如果组件没有定义插槽,那么使用组件时传入的自定义内容会被丢弃
v-solt
vue官方规定,每一个slot插槽,都要有一个name名称
如果省略了slot的name属性,则有一个默认名称叫做default
1
2
3
4
| <template>
<!-- 声明一个插槽区域 -->
<solt name="default"></solt>
</template>
|
默认情况下,在使用组件的时候,提供的内容都会被填充到名字为default的插槽之中
使用v-slot可以将自定义内容填充到指定的slot
1
2
3
4
5
6
7
8
9
10
11
12
| <template>
<template v-slot:default>
<p>
这是Left组件的内容区域,名称的p标签
</p>
</template>
<template #default>
<p>
这是我的自定义内容
</p>
</template>
</template>
|
注意
- 如果要把内容填充到指定名称的插槽中,需要使用
v-slot:这个指令 v-slot:后面要跟上插槽的名字v-slot:指令不能直接用在元素身上,必须用在template标签上template这个标签,它是一个虚拟的标签,只起到包裹性质的作用,但是,不会被渲染为任何实质性的html元素v-slot:指令的简与形式是#- 如果需要定义插槽的默认内容,直接写在组件的
slot标签中
具名插槽
插槽取了名字,能够传入多个自定义内容
1
2
3
4
| <!-- 要被使用的带插槽的组件 -->
<template>
<slot name="article"></slot>
</template>
|
1
2
3
4
5
6
7
8
9
10
11
12
13
14
15
16
17
18
19
20
21
22
23
| <template>
<Home>
<template v-slot:article>
<div>
<p>这是一篇文章中的一段话</p>
<p>这是一篇文章中的一段话</p>
<p>这是一篇文章中的一段话</p>
<p>这是一篇文章中的一段话</p>
<p>这是一篇文章中的一段话</p>
</div>
</template>
</Home>
</template>
<script>
import Home from '@/components/Home.vue'
export default {
components: {
Home
}
}
</script>
|
作用域插槽
通过插槽可以获取插槽组件中定义的数据
在封装组件时,为预留的<slot>提供属性对应的值,这种用法,叫做”作用域插槽“(插槽中带数据)
1
2
3
| <template>
<slot name="article" msg="hello world" :user="userInfo"></slot>
</template>
|
1
2
3
4
5
6
7
8
9
10
11
12
13
14
15
16
17
18
19
20
21
22
23
24
25
26
| <template>
<Home>
<!-- 建议使用scope来接收插槽数据 -->
<template v-slot:article="scope">
{{ scope.userInfo }}
</template>
</Home>
</template>
<script>
import Home from '@/components/Home.vue'
export default {
components: {
Home
},
data() {
return {
userInfo: {
name: '张三',
age: 20
}
}
}
}
</script>
|
自定义指令
vue官方提供了v-text、v-for、v-mogel、v-if等常用的指令。除此之外vue还允许开发者自定义指令。
vue中有私有自定义指令和全局自定义指令
私有自定义指令
在每个vue 组件中,可以在 directives节点下声明私有自定义指令。示例代码如下:
1
2
3
4
5
6
7
8
9
10
11
12
13
14
| export default {
directives: {
color: {
bind(el) {
console.log('触发了v-color的bind函数')
el.style.color = 'red'
}
}
}
}
|
获取指令绑定的值
使用binding.value来获取传递的值
1
2
3
4
5
6
7
8
9
10
11
12
13
14
15
16
17
18
19
20
21
22
23
24
25
26
| <template>
<p v-color="color">这是一段话</p>
</template>
<script>
export default {
data() {
return {
color: 'blue'
}
},
// 私有自定义指令的节点
directives: {
// 定义一个color指令,指向一个配置对象
color: {
// 当指令第一次被绑定到元素上的时候,会立即触发bind函数
// 形参中的el表示当前指令所绑定的那个DOM对象
// 第二个参数推荐使用binding
bind(el,binding) {
console.log('触发了v-color的bind函数')
el.style.color = binding.value
}
}
}
}
</script>
|
update函数
bind函数只调用1次:当指令第一次绑定到元素时调用,当DOM更新时 bind函数不会被触发。update数会在每次DOM更新时被调用。示例代码如下:
1
2
3
4
5
6
7
8
9
10
11
12
13
14
15
16
17
18
19
20
21
22
23
24
25
26
27
28
29
30
31
| <template>
<p v-color="color">这是一段话</p>
</template>
<script>
export default {
data() {
return {
color: 'blue'
}
},
// 私有自定义指令的节点
directives: {
// 定义一个color指令,指向一个配置对象
color: {
// 当指令第一次被绑定到元素上的时候,会立即触发bind函数
// 形参中的el表示当前指令所绑定的那个DOM对象
// 第二个参数推荐使用binding
bind(el,binding) {
console.log('触发了v-color的bind函数')
el.style.color = binding.value
},
// 在DOM更新的时候,会触发update函数
update(el,binding) {
console.log('触发了v-color的bind函数')
el.style.color = binding.value
}
}
}
}
</script>
|
函数简写
如果bind和update函数中的逻辑完全相同,则对象格式的自定义指令可以简写成函数格式:
1
2
3
4
5
6
7
8
9
10
11
12
13
| export default {
data() {
return {
color: 'blue'
}
},
directives: {
color(el,binding) {
el.style.color = binding.value
}
}
}
|
全局自定义指令
全局共享的自定义指令需要通过Vue.directive()进行声明,示例代码如下:
1
2
3
4
5
6
7
8
9
10
11
12
13
14
15
|
Vue.directive('color', {
bind(el, binding) {
el.style.color = binding.value
},
update(el, binding) {
el.style.color = binding.value
}
})
Vue.directive('color', function(el, binding) {
el.style.color = binding.value
})
|
main.js中的小提示
Vue.config.productionTip = false表示是否能看到vue在控制台的提示信息
ESLint
可组装的JavaScript和JSX检查工具
官网地址
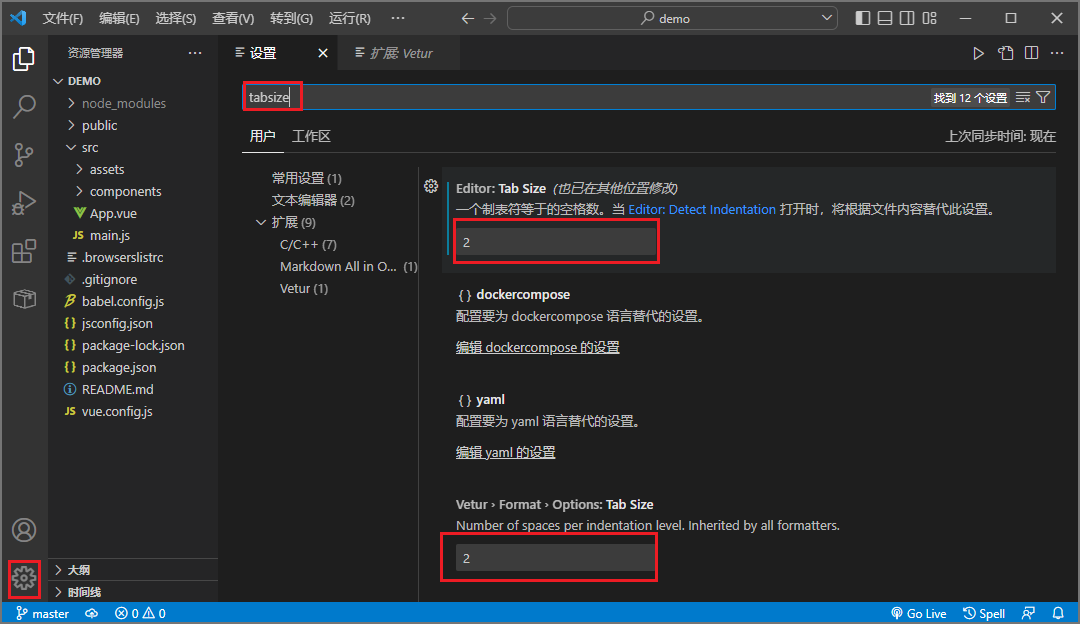
vscode安装vetur插件,并更改vscode缩进为2格
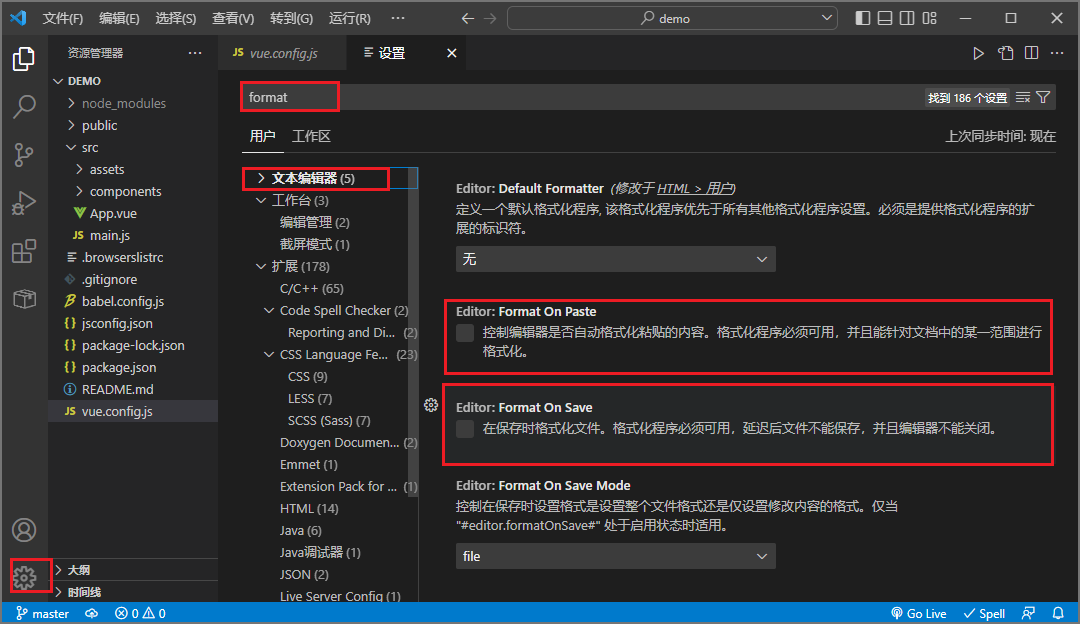
设置粘贴的代码格式化和保存时代码格式化
配置文件的rules规则
创建一个带ESLint的vue项目
1
2
3
4
5
6
7
8
9
10
11
12
13
14
15
16
|
$ vue create demo
|
项目根目录中的.eslintrc.js文件就是ESLint的配置文件
1
2
3
4
5
6
7
8
9
10
11
12
13
14
15
16
17
18
| module.exports = {
root: true,
env: {
node: true
},
extends: [
'plugin:vue/essential',
'@vue/standard'
],
parserOptions: {
parser: '@babel/eslint-parser'
},
rules: {
'no-console': process.env.NODE_ENV === 'production' ? 'warn' : 'off',
'no-debugger': process.env.NODE_ENV === 'production' ? 'warn' : 'off'
}
}
|
配置文件的rules节点下的配置含义可以在官方文档中查到
配置Visual Studio Code
VSCode插件,我只配了ESLint
ESLint
1
2
3
4
5
|
"editor.codeActionsOnSave": {
"source.fixAll": true
}
|
axios
如果有很多个组件都要使用axios,每个组件都import以下,很麻烦
挂载axios
因为每个组件都是Vue的一个实例,就可以为Vue挂载一个属性,在main.js为Vue挂载
1
2
3
4
5
6
7
8
9
10
11
12
| import axios from 'axios'
import App from './App.vue'
import Vue from 'vue'
axios.defaults.baseURL = 'http://www.baidu.com:8089'
Vue.prototype.$http = axios
new Vue({
render: h => h(App)
}).$mount('#app')
|
挂载axios在Vue上的方法不太好,不能实现api接口的复用